Article courtesy of Garden Gate Magazine
Creating Shade and Privacy
Shady Structure
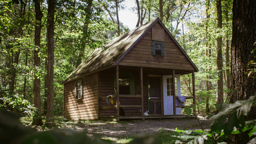
Given a choice, most people prefer to sit under or near a structure in the garden — that sense of shelter overhead makes it seem safe and protected. This gazebo, at 10×12 ft., offers plenty of space to gather a group of friends underneath. And it not only provides shade: Its fabric top is sturdy enough to keep you dry in a gentle rain, too.

Before the snow flies here in the Midwest, we’ll unclip the canopy from the gazebo, hose it off and make sure it is dry before storing it for winter.
Some gazebo kits come with anchors or tie-down stakes. This one, although lightweight, held up well even in a windy Midwest summer. (Wind vents in the roof make it less likely to lift off in a high wind.)
Softening the Edges
Our gazebo came with mosquito nets. They clip onto a built-in rail system along the top edge of the gazebo, and you can zip the nets closed — a definite bonus in our mosquito-filled summers! 
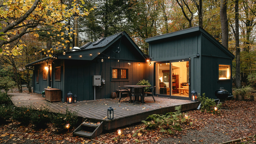
Welcome as the mosquito nets are, we wanted to take it a step farther. A set of heavy canvas outdoor curtains softens the edges of the gazebo, adds extra shade and blocks unwanted views. Although the fabric is heavy enough for outdoor use, it adds a lovely dimension to the gazebo as dappled light filters through it to illuminate the seating area. We added a wire curtain holder (using metal screws to attach it to the gazebo frame) to hold the curtains. We used ready-made curtains, but these simple rectangles of fabric would be easy to sew.

A wire curtain holder from Ikea® was easy to add, and it let us hang another layer of curtains on the gazebo.
Did You Know?
If you want curtains to look full when pulled, they need to be two to three times the width of the space they’re covering.
If you want curtains to look full when pulled, they need to be two to three times the width of the space they’re covering.
See also How to Remodel a Deck
Innovations
The curtains look great, but on a windy day, they do present a few difficulties! We experimented with several different ways to keep them from blowing around, and found some solutions that worked.
The curtains at the front and sides of the gazebo need to be able to open and close, and that’s where people enter this seating area. So we just pulled those curtains back against the posts and secured them with tiebacks.

But at the rear of the gazebo, where we wanted to keep the curtains closed to block the view, we threaded a length of chain from the hardware store through the hem at the bottom of the curtain as you can see in the photo above. Then we used long plastic zip ties to attach the ends of the chain to the legs of the gazebo. Presto! No more blowing curtains. You can still pull them open, too, if you wish. Just don’t use this method at the entrance to your outdoor sitting area, as the chains will present a tripping hazard.

Buy a length of chain that’s long enough to stretch between the legs of the gazebo, then fasten both ends with heavy-duty 36-in. zip ties.
Now you’ve seen how curtains can dress up your gazebo, but we haven’t even started talking about the other things that make an outdoor living space great. Keep reading and we’ll get going on rugs and furnishings!
Make It Cozy

We chose a symmetrical layout for the furniture. That adds a look of formal elegance that goes well with the dark color and traditional styling of the gazebo itself.
Define Your Space
An area rug in the living room helps define a seating area, and an outdoor rug fills the same need in this gazebo.
An area rug in the living room helps define a seating area, and an outdoor rug fills the same need in this gazebo.
A good rule of thumb is that your rug should be large enough so that at least the front legs of furniture can rest on it — it helps pull the furniture together, and ensures that the rug will feel in proportion to the space. But sometimes it’s hard to tell what size rug really works in a space, so we tested a couple of sizes with our easy method below.
We chose a rug with a busy, high-contrast pattern. The pattern feels formal and traditional, but it’ll hide footprints, fallen leaves and the occasional spilled drink.
Try This!
Not sure which size of rug to purchase for your outdoor room? Experiment by folding a canvas drop cloth into standard rug sizes to determine what will define your space the best.
Not sure which size of rug to purchase for your outdoor room? Experiment by folding a canvas drop cloth into standard rug sizes to determine what will define your space the best.
Please Be Seated
Comfortable furniture is key to enjoying any outdoor seating area. A traditional style and neutral color palette will keep this furniture looking great for years. A loveseat and two chairs give a lot of flexibility in how you arrange them. We tried a few different angles, but decided that a balanced, symmetrical arrangement — the loveseat in the middle and the chairs at both sides — was best for a formal feel. And we wanted the main view out of the gazebo to be over the lawn and garden, so we put the biggest piece, the loveseat, facing the garden. (As you add new planting areas to your garden, you may want to change views, but it’s easy to move the furniture around as needed.) A center coffee table means that everyone can set down drinks or books easily. And there’s plenty of room at the front to move around the gazebo, too.

Add comfort with lumbar pillows in a similar color palette but in a contrasting pattern for visual interest.
Once the furniture is in place, add pillows for extra comfort. Mix in a few shapes and colors for extra visual interest — above, we chose pillows in shades of rust and brown for a low-key, comfortable look. We especially like small, rectangular lumbar pillows that can be tucked behind your back for extra support. Outdoor cushions stand up well to dust and moisture, and with the extra protection of the gazebo top, this furniture and pillows should resist fading for several years.
Color Change
It’s incredible what a difference a change of colors can make! In previous photos, you saw a soothing palette of rust-red, tan and brown — quiet, relaxing colors that are perfect in the garden. But a more dramatic combination of black, white and chartreuse gives a completely new look to this gazebo.

The wonderful thing about this change is that it’s so easy. The neutral-toned furniture is the same, as is the rug. All we had to do was swap out the throw pillows, add a few green glass candleholders and cut some green hydrangea blossoms from the garden.

A bold mix of patterns shows up strongly against the neutral background.
If you like to change the looks of your outdoor room often, just keep a change of pillows in an outdoor storage trunk, and you can have a fresh, new feel in minutes.
See also Design Tips: How to Decorate a Patio
Help Yourselves
When you’re entertaining outside, a cart for snacks and drinks means you don’t have to keep running inside to the refrigerator. You can purchase a ready-made cart, or customize an antique, as we did. This old sink stand has everything you need for handy serving.

A stainless steel bowl slipped into the opening to hold ice, and a bottom shelf holds bottles. Towel racks at the side do double duty. One side holds a towel, while the other side holds spare wine glasses. In the photo below, you can see how we slipped clear flexible tubing over the metal bar to make it a better fit for hanging wine glasses. We placed the cart to one side, where it’s convenient for anyone who wants a drink, but won’t block the view or access
to seats.
to seats.

Flexible tubing slipped over the basin’s handle increased its diameter and also created a non-slip surface — wine glasses won’t slide off easily.
What’s next? Plants, of course! Read on to see how containers dress up this seating area.
Add Life with Containers
_7556_2018-07-10_15-46.jpg)
The rich brown of the urns repeats the warm earth tones of the furnishings. Decorative moss dresses up the bare soil in the container and cuts down on watering needs, too.
Nothing dresses up a patio like plants in containers. They add color and pull the garden up close for you to enjoy.
Let us walk you through the thought process as we pick out plants and containers for this patio.
See also Gardening Gear
Add Height
With the height and the strong vertical lines of the gazebo, we knew we needed some big containers and tall plants to keep the plantings from feeling too small. We started with the inside. A potted palm from inside the house will enjoy spending the summer outdoors. The gazebo will give it a little shade to keep it from scorching, but it gets plenty of light. (Just remember to water it, since it won’t get any moisture from rain while it’s under the canopy.) The tall palm, raised even higher in a large, footed urn, bridges the height difference between the furniture and the top of the gazebo. Tucked back in the corner, it won’t dangle fronds into your face, either.
Then we moved on to the outside. In the photo below, you can see our first attempt at containers — pretty, but they didn’t have the formal effect we were trying to create.

This didn’t work. We had a couple of big containers we thought would look nice here, but once we saw them together, we realized that we needed matching containers on either side to create the formal, traditional look we were trying to create. If we had two of either of these, they would have looked fine, though!
Next, we decided that black containers would add some drama, while echoing the metal frame of the gazebo. When you’re choosing containers, it’s OK to mix and match. A good way to make sure you still end up with a cohesive look is to choose one common theme, either color or shape. Below, different sizes and shapes of black containers give plenty of visual interest, but it’s clear that the containers really do belong together.
Simple Progression
What’s Inside?
With the formal feel of the gazebo and furniture, we chose simple, elegant plantings. A mix of white, purple and dark pink looks restful, but still adds a pop of color. Instead of mixing lots of different plants together in each container, we stuck to a simple plan — the two small containers only have one kind of plant each. You still get the effect of a mixed planting, but it makes it much easier to swap out plants as the seasons change. A small, upright arborvitae gives the feel of a formal topiary, without the work! Trailing ivy and white begonias around the edge of the tall pot keep it from overwhelming the other containers. Purple butterfly bush blooms a long time (and it’ll attract butterflies to your patio), while dark-pink cape daisy add a hint of brighter color.
Quick Tip!
Don’t strain your back — a two-wheel cart is the perfect tool to move containers around the garden. (That’s especially important when you’re experimenting with groupings.)