There are many reasons to build a bat house. Chief among them: A single little brown bat can devour 500 to 1,000 mosquitoes in an hour. There’s some debate about whether that’s a significant number, but look at it this way – that’s thousands fewer skeeters that can snack on you in an evening.
Here’s a building plan for a simple bat house that will hold up to 50 bats.
After you build a bat house, mount it at least 12 feet above the ground on a wooden or masonry building if possible. Place the house so it faces south in cooler climates or east in hotter climates.
Recommended tools:
• Table saw or handsaw
• Variable speed reversing drill
• Phillips bit for drill
• Tape measure or yardstick
• Caulking gun
• Paintbrushes
• Tin snips (optional)
• Hammer (optional)
Materials needed (makes one):
• 1/4 sheet (2x4 feet) 1/2-inch ACX (outdoor grade) plywood
• 1 piece 1-inch x 2-inch x 8-foot pine (furring strip)
• 20-30 1-inch coated deck or exterior grade Phillips screws
• 1 pint dark, water-based stain, exterior grade
• 1 pint water-based primer, exterior grade
• 1 quart flat water-based paint or stain, exterior grade
• 1 tube paintable latex caulk
• 1-inch x 3-inch x 28-inch board for roof
• Black asphalt shingles or galvanized metal (optional)
• 6-10 7/8-inch roofing nails (optional)
Construction procedure
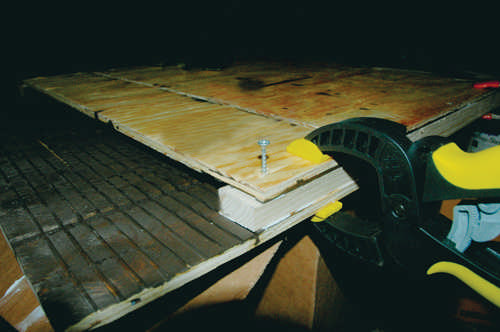
1.?Measure and cut plywood into three pieces: 26 1/2 inches x 24 inches (backboard), 16 1/2 inches x 24 inches (front, top), 5 inches x 24 inches (front, bottom)
2. Roughen inside of backboard and landing area by cutting horizontal grooves with sharp object or saw. Space grooves about 1/4 to 1/2 inch apart, cutting 1/16 to 1/32 inch deep.
3. Apply two coats of dark, water-based stain to interior surfaces. Do not use paint, as it will fill grooves, making them unusable.
4. Measure and cut furring strip into one 24-inch and two 20 1/2-inch pieces.
5. Attach furring strips to backboard with screws, caulking first. Attach the 24-inch piece across top. Attach the 201/2-inch pieces down each side. The interior of bat house (roosting chamber) will be 3/4 inch deep.
6. Attach front pieces to furring strips, top piece first (don’t forget to caulk). Leave 1/2-inch vent space between top and bottom front pieces.
7. Caulk around all outside joints to further seal roosting chamber.
8. Attach a 1-inch x 4-inch x 28-inch board to the top as a roof.
7. Caulk around all outside joints to further seal roosting chamber.
8. Attach a 1-inch x 4-inch x 28-inch board to the top as a roof.
9. Paint or stain exterior three times (use primer for first coat).
10. Cover roof with shingles or galvanized metal (optional).
Plans provided by Bat Conservation International, www.batcon.org
10. Cover roof with shingles or galvanized metal (optional).
Plans provided by Bat Conservation International, www.batcon.org
 Steve Umland
  Steve Umland