Article Courtesy of Woodsmith.com.
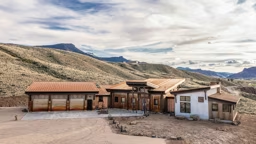
Whether you want to create a formal entryway to your home or a casual path in your backyard, few options are better than a paver pathway. There are a lot of reasons to consider them.
First of all, pavers add a warmth to your landscaping that’s undeniable. See a good-looking paver path, and it just begs to be followed.
Pavers are also available in a huge variety of styles, which means you can create any atmosphere you want, from sophisticated to laid-back. Each path has a distinctive feel and a unique look. But they’re both built in essentially the same way.
See also Design Ideas for Cabin Decks and Porches
Pattern Possibilities
The ability to customize comes from the fact that pavers are made from several materials, such as stone, clay, and cast concrete. And they’re available in nearly any combination of size, color, and shape that you can imagine. Just a few paver options are shown on page 73. Clay and cast concrete pavers are available as near as your local home center, while stone versions are usually sold in landscaping supply stores.
In addition to options in type, size, and color, most pavers can be laid in different patterns. Traditional clay “brick” pavers, for example, can sit in simple rows known as a “running bond” pattern, as shown in the Illustration on page 73. Or they can be arranged in a more formal “herringbone” arrangement, as shown in the Photo at right. A “basket weave” is another popular pathway option.
Cast concrete pavers offer even more options because they’re usually made in three or four sizes that are designed to work together. That means you can choose just one size, as shown at right, or mix and match the sizes to create unique patterns. And you can mix paver colors for even more variety. In the end, options in paver patterns are limited only by your imagination and the degree of complexity you’re willing to tackle with your project.
See also Adding a Pergola to a Cabin Deck
Pathway to Success
But pavers also offer one more huge advantage when it comes to creating pathways (and even patios, driveways, and more) around your home. Pavers are downright DIY-friendly. They’re readily available, lightweight enough for anyone to handle, and don’t require many specialized tools.
Building a paver pathway does require labor, though. You’ll have to do some digging, and then move a lot of rock, sand, and pavers. But if you’re willing to put in the effort, you can really add style and value to your landscape, and at a fraction of the price you’d pay to have it done.
The one thing you’ll definitely need, regardless of the type or style of pathway you plan to build, is a solid understanding of how a paver pathway goes together. That’s what we’ll cover on the next few pages. Again, there’s nothing difficult about the process, but the proper preparation and techniques will ensure that your new path looks great for decades.
Pathway Anatomy
Before you dig into your pathway project, you need to understand what’s involved. There’s more to it than just laying them out on the ground. The Illustrations above show that the pavers sit on a two-layer base. The bottom layer is crushed stone that gets compacted to form a solid foundation. A layer of sand sits atop that to form a setting bed for the pavers. Both sides of the path are held in place with edging that keeps the pavers from shifting around. And sand gets swept between the pavers to lock them together, so they don’t move around underfoot.Plan the Pathway
With these things in mind, you can start your project by drawing a sketch of your pathway. Take your time to measure accurately and draw your yard to close scale. Then make several photocopies of the drawing. That way, you can sketch multiple ideas for your path to determine its shape and location. Plus you can add measurements to this drawing to determine the quantity of pavers and other supplies you’ll need to buy.Don’t be surprised, by the way, when you realize that a path of any size will call for hundreds of pavers, and possibly several tons of base rock and sand. The folks at the home center can help you calculate how much you’ll need. Then you can determine if you want to make multiple trips with a truck or have everything delivered.
See also Upgrading the Deck
Excavate
When you have your materials, it’s time to get out the shovel and excavate. You won’t be digging deep, but be sure to call first and have local utilities located. Then dig a flat-bottomed trench (Fig. 1). The depth should allow for the thickness of your pavers, a 1"-thick sand bed, and a base that’s at least 2" thick. (If your soil is soft, plan on a 4"-thick base.)Prepare the Base
Next, you need to compact the soil in the bottom of the trench using a plate compactor. You can rent one for about $60 per day. Run it over the bottom of the trench a couple times to firm up the soil.Now add the crushed base stone (Fig. 2). Then compact the rock until it’s solid. If necessary, add more rock and compact again. This base layer needs to be smooth and flat.
Add Edging
With the base done, you need to add the edging that will hold the pavers in place. You can either measure and install the edging on both sides of the path, or just edge one side, and then do the other after the pavers are in. That depends on the edging you use, the path shape, and the pavers. Check the manufacturer’s recommendations.Make the Bed
The sand comes next. The best way to ensure a consistent thickness is to lay 1" pipes on the base, cover them with sand, and then spread the sand with a 2x4 (Fig. 3). Then remove the pipes and fill in the gaps.Place the Pavers
Now it’s time to lay the pavers (Fig 4). Set them gently on the sand. Don’t hammer or press them in. If pavers need to be cut, you can do that as you go. Or just leave out the ones that need cut for now, and do all the cutting at once later on.Once everything is in, sweep dry sand over the path, and work it between the bricks with the plate compactor. Finally, fill dirt in along the edges of the path.
See also Deck Maintenance Tips
Cabin Pathway Tips:

DON’T SQUANDER CURVES.
Curved paths can offer an aura of mystery. Don’t hide them behind plants or leave them in the open.

DO ENHANCE CURVED PATHS.
Plant shrubs and perennials on the outside of the curve. Put the larger plants at the back of a planting.
DIY: Build a Cabin Pathway