Story by Dean Kuczynski
Photos by Julie Kuczynski
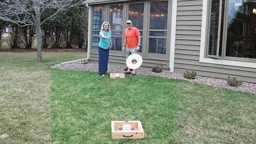
Tailgate Toss, Cornhole, Bean Bag Toss or simply Bags – this classic game goes by many names, and it’s great fun for anyone age 4 to 104. Wouldn’t it be great to have your own set of boards at the cabin? When I got into woodworking, I started looking differently at many things I wanted to buy. I began thinking, “Yeah, I could make that.” Trust me, you can definitely make these, and they’ll provide years of entertainment for you and your cabin guests. A trip to a local home center or lumberyard, a few basic tools and a free Saturday afternoon to make a little sawdust are all you’ll need to complete this fun project!
1 Make Some Sawdust

First, cut the 2x4s to length for the frames and legs. You can make all of these cuts with a circular saw, jigsaw or handsaw. (Don’t forget to use proper hearing and eye protection when operating power tools for this project.) Cut off 1 inch on one end of each of the five boards so you have a nice cleanly cut, square end to start from. Set aside one of the boards. On each of the four remaining boards, measure and cut one 48-inch section and one 21-inch section. These will make up the frames of your boards. On the fifth board, measure and cut four 12-inch pieces for the legs.
2 Frame It Up

3 Top It Off
Use 1¼-inch deck screws to attach the plywood sheets to the frames. Four screws on the short sides and five or six on the long sides should be plenty. Predrill the holes. Make sure the screw heads are level or slightly below the plywood surface. Use wood putty or filler to cover the screw heads.4 Cut It Out
The bag hole on the surface should be positioned 6 inches from the top and be 6 inches in diameter. Measure and draw a centerline lengthwise on the surface of the plywood and make a mark 9 inches from the top edge. This is the center of the hole. If you have one handy, use a compass set at 3 inches to draw the 6-inch hole. I couldn’t find mine, so I went to the kitchen and found a disposable food container; 6 inches round is a common size for these. Tracing the lid worked out nicely. Use a large bit in your drill to make a hole on the inside edge of your circles. Use this as your starting point for your jigsaw or your keyhole or compass handsaw. Take your time cutting out the holes.5 Smooth It Out
Get out your palm sander or random orbital sander, and get to work making some more sawdust. Sand the entire surface and frame, smoothing out any imperfections in the wood and rounding off sharp edges and corners. I recommend finishing with 150-grit sandpaper for a paint-ready surface.6 Give It Some Legs
Grab those 12-inch legs we set aside earlier. You’ll need to drill a ?-inch hole in each, centered 13/4 inches from one end and 13/4 inches from the top. You’ll need to round off this end on each leg to allow them to be folded into the bottom of the board for storage. My compass was still missing, but I found that the ring lid for a wide-mouth Mason jar was the perfect 3½-inch diameter I needed to mark the round ends. Cut them with your jigsaw or keyhole or compass handsaw. Sand the finished legs smooth. Lay two of them inside the frame on the underside of each board at the end with the 6-inch hole and use a pencil through the drilled ?-inch hole to mark where to drill on the frame. Drill ?-inch holes through the frame. Attach the legs by inserting hex bolts from outside the frame, through the legs, and securing with a washer and a nut on the inside.7 Level It Out

8 Dress It Up
It’s time to paint. Use a good quality gloss spray paint and whatever design and colors you desire. I went with a classic design in opposite colors for my boards. Use the colors of your favorite team if you’re a sports fan, or ask your kids or grandkids to help design them. You’ll need at least two coats of paint for a good glossy surface. Follow the paint manufacturer’s instructions. After the paint has dried, attach optional handles on the long sides of the boards for easy transport.Let's play!

The rules of the game are simple. For fun, try creating your own house rules.
- The boards are placed 27 feet apart, measured from the front of one to the front of the other. Shorter distances are fine for beginners, youngsters or if there’s insufficient space.
- The “pitcher’s box” is the area to the left or right of the board. The foul line is the front of the board. Step over this line and you may get pelted with a bag …
- The game can be played with two players, but four players in teams of two can be more fun. Your teammate stands opposite you at the other board.
- Flip a coin or have a staring contest to see who goes first. Each player pitches four bags, alternating with their opponent. In subsequent frames, the team that scored last pitches first.
- Bags in the hole score three points. Bags landing on the board score one point. Bags touching the ground are out of play.
- After all eight bags have been tossed, each player’s total is added up, and the difference goes to the team with the higher total. For example, if Johnny lands one on the board and one in the hole for four points, and Suzie lands one on the board and two in the hole for seven points, four points from the round cancel out, and Suzie scores three points for her team.
- The first to score 21 points wins the game and the admiration of all present.
DIY Bags
I bought my bags because I’m better with a table saw than a sewing machine. You can certainly make your own, of course. They’re best made with sturdy duck cloth (in two colors for opposing teams) and feed-grade dried corn. Start with two 7-inch fabric squares double-stitched together on three sides, ½-inch from the edges. Turn the pouch inside out and fill with about 15 ounces of corn. Tuck and double-stitch the open side closed. The final product should be 6 inches square and weigh about 1 pound. Repeat seven more times, then get out and practice tossing them at your new boards!
Dean Kuczynski is a self-taught hobbyist woodworker who enjoys backyard sports that can be played while holding a beverage.