


Making a candle stand is a great way to use small, prized pieces of figured or exotic wood. The one shown in the photo above is a good example. It gave me the opportunity to combine a nice piece of maple I’d been saving with some shorter cutoffs of cocobolo. And small projects like this also offer a great chance to showcase your joinery and finishing skills. It will get a lot of scrutiny because it invites close inspection, so it requires a lot of attention to detail.
Don’t get me wrong, making this centerpiece doesn’t involve complicated joinery or construction techniques. But it’s the kind of project where even the smallest details – like sanding the end grain of the feet until it’s almost polished – are very noticeable. And spending a little extra time sanding the finish between coats to get a perfectly smooth surface will also make a big difference. The result will be a welcome addition to any home. 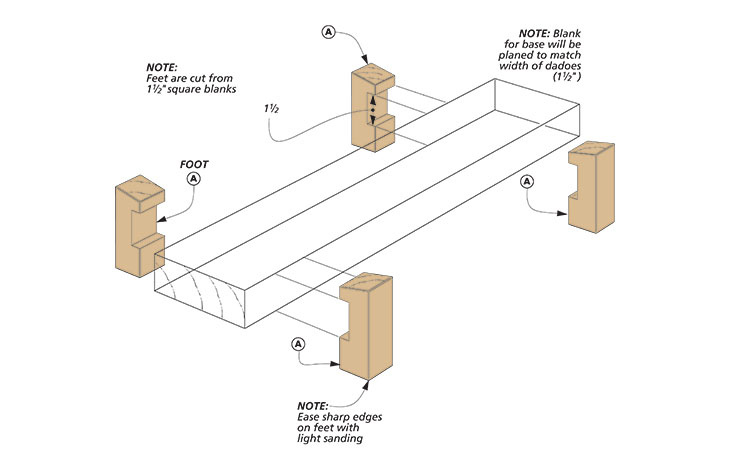
Making the Feet
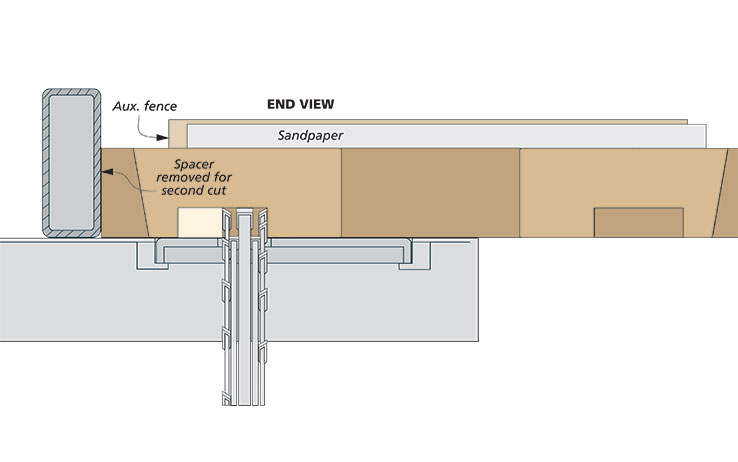
One of the notable things about this project is its simplicity. It’s just a base drilled to accept six glass candle holders with four contrasting hardwood feet. As you can see in the drawings at right, the feet have a 11?2-inch wide dado, so you’ll need to cut it in two passes at the table saw. Later, you can plane the blank for the base to fit the dadoes.Cut the Dadoes. To make the dado cuts in the feet, I started with a couple of long blanks. This way, you’ll have plenty to hold on to when using the miter gauge to guide the workpiece. I attached an auxiliary fence to the miter gauge to support the cuts. I also glued a piece of sandpaper to the face of the fence to prevent the blanks from “creeping” out of position. Then, with the dado blade set to 3?4-inch wide, you can make the first cut using a 3?4-inch spacer block clamped to the rip fence. Now it’s just a matter of rotating the blank end-for-end and repeating the cut on the other end. Then remove the spacer block to make the second cut. This method guarantees an evenly matched set of dadoes, exactly 11?2-inch wide.
Completing the feet. With the dado cuts complete, all you need to do is cut the bevel on the ends and cut the feet to length I started by installing a good crosscut blade on the table saw to get the smoothest cut possible. Then I set the angle to 10° to make the bevel cut on each end. Finally, you can return the blade to 90° and use a stop block on your auxiliary fence to cut the feet to length.
Bevel the Ends. With an auxiliary fence on the miter gauge and a strip of sandpaper on the face to prevent the piece from slipping, cut a 10° bevel on each end of the oversized blank.
Cut to Length. Now reset the blade to 90° and clamp a stop block to the fence to mark the finished length. The stop block will guarantee the feet are cut to the same length.
Making the Base
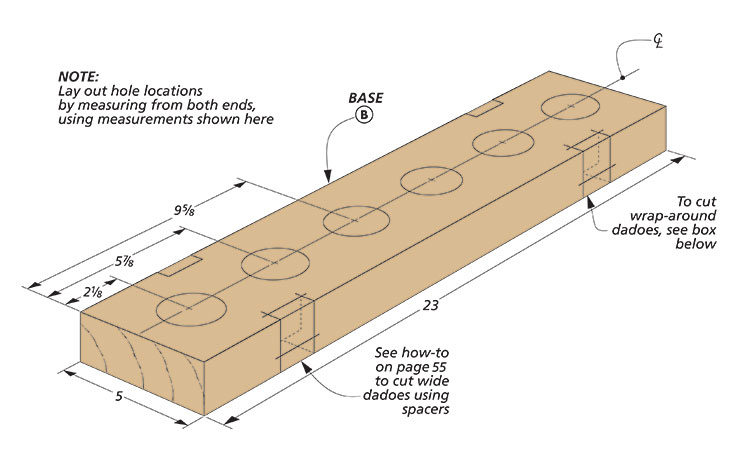
You can now turn your attention to the base of the centerpiece. You’ll start with a solid blank, drill holes for the candles, make the joinery and bevel cuts, then rip it in half to add the decorative gap. Two stretchers in dadoes on the bottom of the base tie the two halves together.
Drill the Holes. After jointing and planing the blank square, the next step is to drill the six holes for the candles. To get started, I marked the centerline of the blank. Then I marked the location of the holes and drilled them using a 2-inch-diameter Forstner bit.
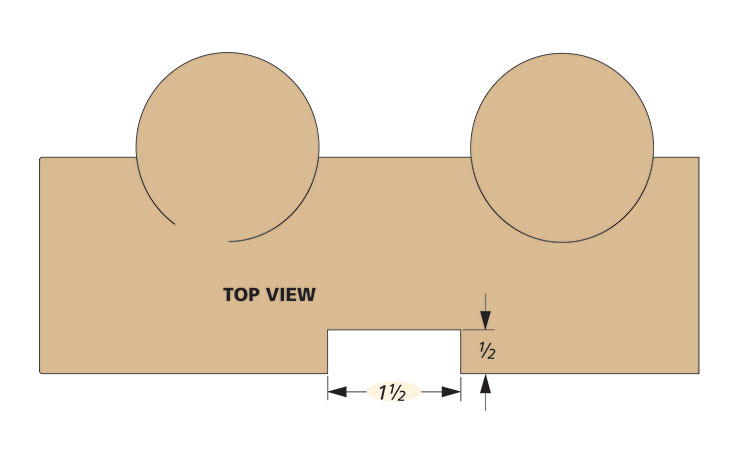
Wide Dadoes. With the holes drilled, you’ll need to move to the table saw with a dado blade installed and set to make a 3?4-inch-wide cut. I used the same setup to cut the “wrap-around” dado on the stand as I used for the feet. The box below shows the steps for making these wide dado cuts. Using an auxiliary fence on the miter gauge and a spacer on the rip fence, you can make the first cut on the edge of the blank. Then rotate it to cut the opposite edge. You’ll need to lay the piece flat to cut the bottom dado. Finally, just remove the spacer block and repeat the cuts on the opposite end of the blank to match the 11?2-inch width of the feet.
The Bevel Cuts. Now you’re ready to make the bevel cuts on the ends and sides of the blank. After tilting the blade on the table saw 10°, I made the cuts on each end. To make the cuts on the sides, you’ll use the same blade tilt setting. All you need to do is set the rip fence and rip the matching bevel on each side of the base.
Split the Base. With the joinery cut, the holes drilled, and the sides and ends beveled, the last step in preparing the base is to rip it down the center. Since you already have the centerline established from drilling the candle holes, you just need to return the saw blade to 90° and make the cut.
The Stretchers. Two hardwood stretchers are screwed to both halves of the base to hold them together. They fit into the dadoes on the bottom of the base. You can cut them to size at the table saw. Then, you’ll need to drill and countersink holes for the screws before moving on to assembly.
Assembly. Now that you’ve completed the parts, the assembly should go pretty smoothly. I started by cutting a 1?8-inch-thick spacer to place between the two halves of the base to hold them apart. Then, after screwing the stretchers in place, I fit the legs to the base with glue and clamps.
\
Sand & Finish. As I said earlier, this is a project that needs a really thorough sanding and a flawless finish. I took extra care to sand the end grain on the base and legs all the way to 320 grit. This yields a smooth finish and brings out the interesting end grain patterns. To complement the smooth surface, I chose to spray the piece with lacquer. It dries quickly and builds up a nice finish in a hurry. The result is a striking piece that’s at home in just about any setting. Whether you place it on your dining room table or on the fireplace mantel, this centerpiece is sure to look great.
This project featured courtesy Cabin Living’s sister magazine, Woodsmith, woodsmith.com
How-To: Make a Wide “Wrap-around” Dado
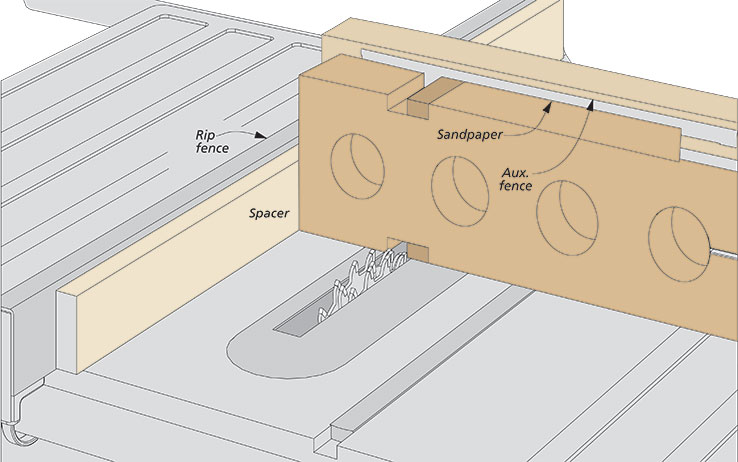
Dado the Edges. With a spacer on the table saw’s rip fence and an auxiliary fence on the miter gauge, set the rip fence to cut the first (outside) dadoes in both edges.
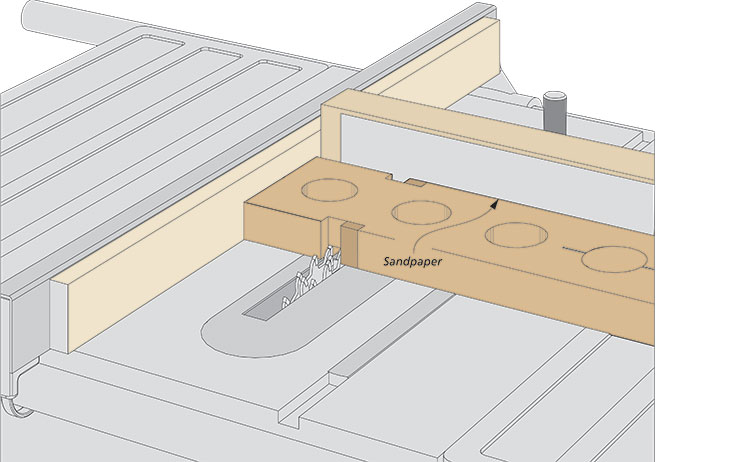
Cut the Bottom Dado. After cutting both edges, lay the base flat and cut the bottom dado. To finish the cuts, remove the spacer from the rip fence and repeat the procedure.

